

Longboard Building
During my first few years of college my friend and I worked together to make our own longboards. We went through a number of iterations in our process until we found one that worked well for us. I think what we arrived on is great for an amateur builder making longboards on small scale like we were. Each board cost around $30-50 depending on the thickness and materials used and the whole process takes around two days. A store bought one would surely cost at least $100. We never had any delaminations(glue seperating) and only one of our 20+ boards we made has broke(mostly due to the weird design I decided on for some reason). If you’re still interested, read on!
How it Works
Basically, the process for making a longboard consists of gluing together a bunch of thin sheets of wood (plies) in a certain shape. The plies are held together into a certain shape using a press with a positive and negative mold. The mold is created to give the board whatever concave, camber, or drops desired in the final product. This way when the glue dries, the stack of plies should be able to hold its shape on its own when out of the press.
The Materials
The are number of different types of wood that can be used for a longboard. The most commons are baltic birch or maple. We only ever worked with baltic birch as that’s all our local lumberyard carried. We found that the only way to get quality wood in the right size thickness was to go to lumberyard. Our first board was made out of “birch” wood from Lowes. When I stepped on it for the first time my foot sunk all the way to the ground. As it turns out most of the specialty woods from Lowes/Home depots are just pine wood with a thin sheet of veneer on the outside for appearances.
After some experimentation we found the best thickness for plies was 1/8” or lower. Baltic Birch comes in thicknesses of 1/4” or 1/8”. Our first boards were made with 1/4”. We found that after removing them from the press the boards would lose their shape after not to long and flatten out. This is due to the internal stresses of the wood from being bent overcoming how well the glue could hold everything in shape. After we switched to using 1/8” plies we had much better success with our boards retaining the shape we wanted.
Most of the boards we made were between 0.5” to 0.75” thick which means we were layering about 4-6 plies. The thickness would depend on if we wanted a flexier board (good for carving boards) or a stiffer one (good for downhill or dancing). We were both around 180-200lbs so a lighter person might want less and heavier person more.
We would usually Titebond II or III to glue up our boards and found either to work well. Though towards then end we would usually stick with Titebond II. Titebond III would be more expensive and only offered more water resistance which was irrelavant for us as we coated all our boards in polyurethane.
We also experiemented with adding layers of fiberglass to our boards. The fiberglass would give some extra pop and springiness to the boards. We ending up using a method that didn’t require vacuum bagging to simplify things. While a vacuum bagging process would have resulted in more strength we still noticed the benefits from the fiberglassing. A layer of fiber glass should only be added on the bottom of the board or in between the bottom most layer and second bottom most layer. Fiberglass is only really effective when it is tension. Placing a fiberglass layer in an upper layer or on top of the board risks placing it above the the neutral axis which guarantees it will be in compression vs tension. Fiberglass also gets a lot of nasty looking bubbles in it after its been in compression. We used some West System epoxy we got from a local marine shop to bond our fiberglass to the board.
The Press
We made our press out of structural plywood (I don’t remember the exact designation sadly) and carriage bolts. Our press was our own variation of what’s called a Dimm press. The are number of different type of presses out there, we’ve experiemented with most of them and found this to be one of the best for small scale operation. The press can be reused and different molds can be switched out easily.
We would take two sheets of plywood cut to 16”x48” and drill holes for the carriage bolts down each side of the pieces. Then the carriage bolts could be threaded through and tightened to clamp the two pieces of plywood to together.
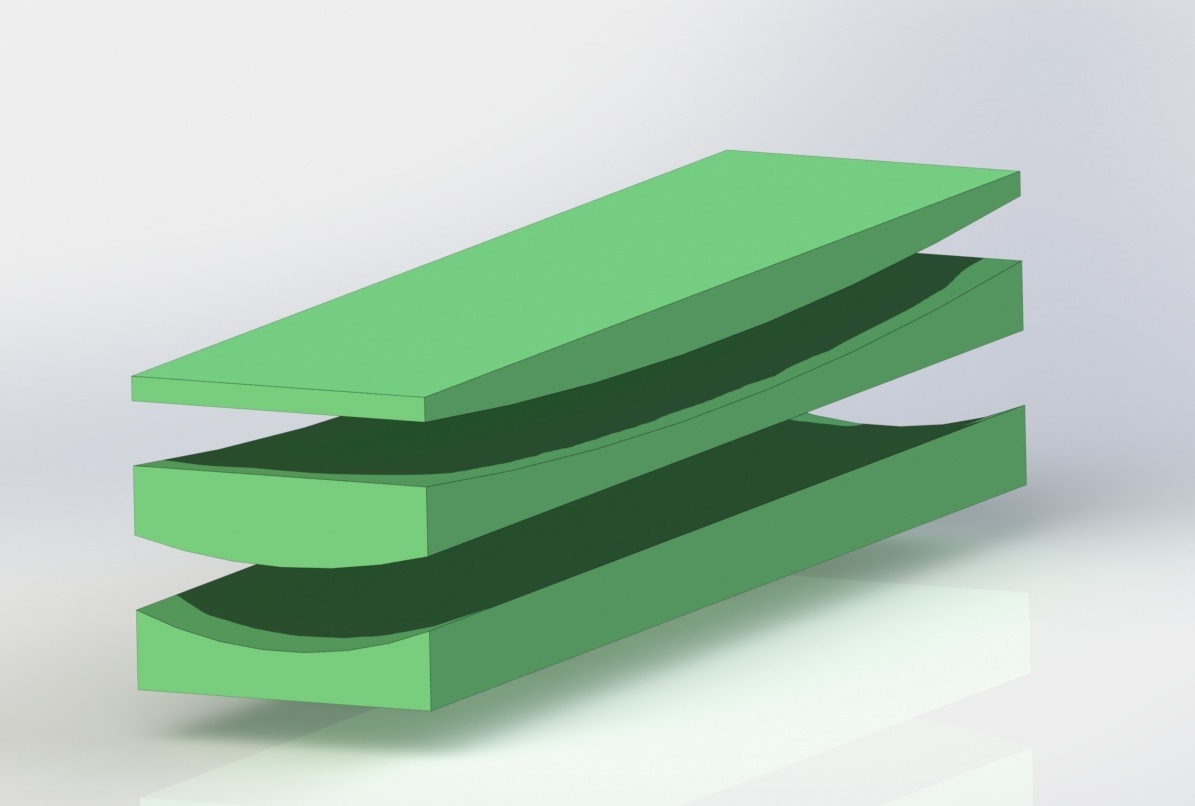
The Mold
The idea with our mold was to cut a positive and negative mold from one rectangular piece of foam. We found that using blue insulation foam worked really well. To make cuts in the foam we created our own hot wire foam cutter. A hot wire foam cutter has a special kind of wire (nichrome or even steel guitar strings) pulled tautly between two points. A current is run through it so that it heats up and makes a clean cut when it passes through foam. There are number of ways to do this, but we made one with some 1”x2”s and a transformer from RadioShack. If you plan on making one, include a tensioner as the wire will expand when it heats up.
By carefully planning the cuts a positive and negative mold can be made from one piece of foam. The process for making a mold with concave and camber can be a bit hard to wrap your head around so hopefully the pictures will clear it up. Basically, it involves making cut for the convave from one side and cut from the other for the concave. The pieces are then rearranged so that when pressed flat the end result has the right curves. Looking at the picture, the middle piece will become the positive mold. The top part of it will be pressed against one side of the press so it will lay flat. For the negative part of the mold, glue the two remaining pieces together on the flat portions then press against the other side of the press so it lays flat. This is a hard thing to explain unless you have it sitting in front of you, I hope my pictures/explanation does it some justice.
When we made our cuts in the foam, we would tack wooden templates on the side to guide our cuts. Sometimes it might be necessary to chop the mold into smaller sections depending on the size of your hot wire cutter.
Putting It All Together
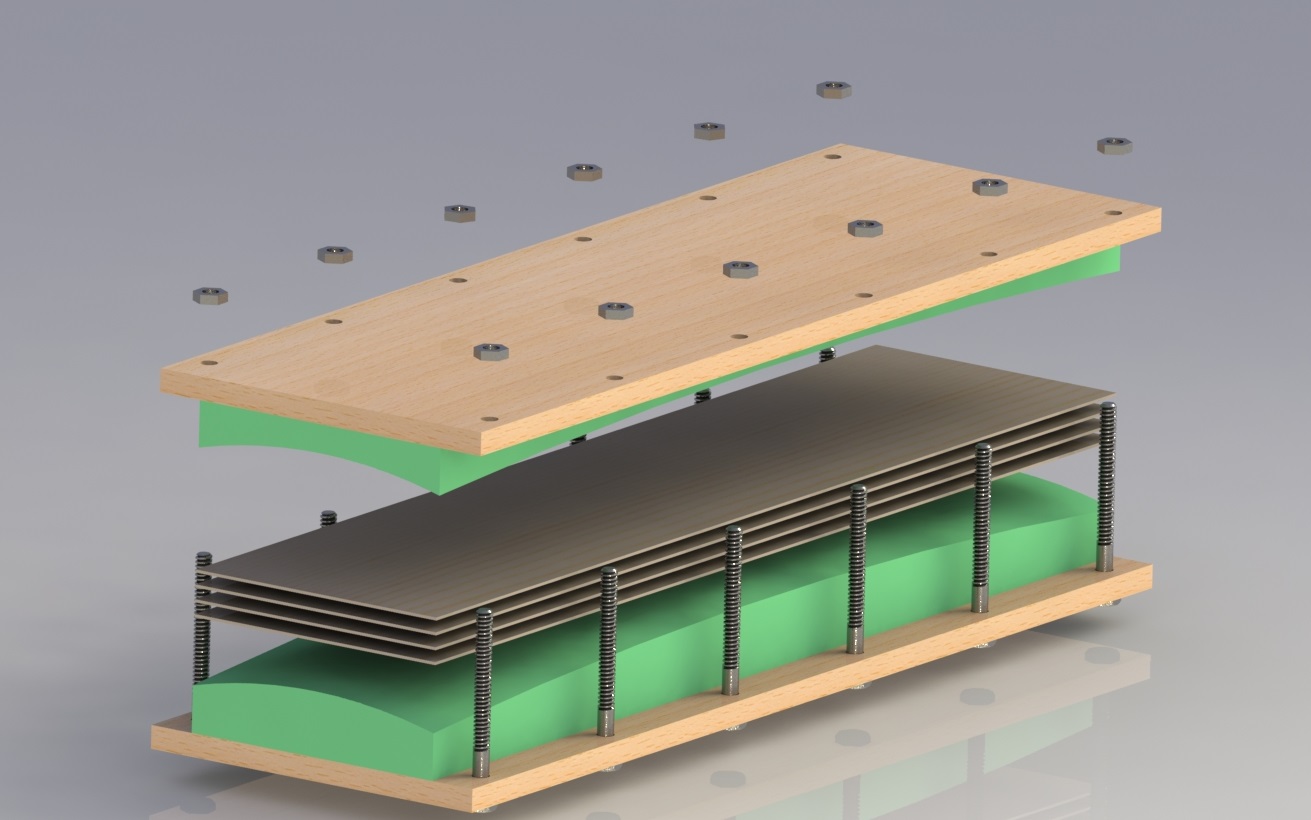
Now everything can be combined and a board can be pressed. First, the mold needs to be attached to the press. We would use a light spray adhesive so it would stay in place during pressing but could be removed when we wanted a different mold. Next, a stack of plies is glued up with glue on every side except the top and bottom. Only a thin layer is necessary, we aimed to use enough to cover it and still see the grain through the glue. Much of the glue will be pressed out of the plies during pressing so too much will just be a waste anyways.
With the plies stacked and glued, they can be placed in the press and the top of the press can be set on top. Then we would each go up and down the sides tightening the carriage bolts. We would use a ruler to measure how far down each nut was tightened and try to make each bolt identical to ensure equal pressure. The glue at this point is probably oozing out of the sides so we would take a cloth and wipe it up. Once everything is tightened down correctly, let the press sit for about 24 hours to let the glue fully cure.
After that it should be safe to take out the deck from the press. All that’s left is to cut it out the shape you want and drill holes for the trucks. I’d recommend coating the board in spar urethane or some sort of clear coat to give some extra insurance against water penetration.